I Tested the iPhone 14 Pro Back Glass Replacement: My Step-by-Step Experience and Tips
When I first unboxed my iPhone 14 Pro, I was instantly captivated by its sleek design and stunning back glass finish. It felt like holding a piece of art in my hands, a perfect blend of technology and elegance. However, life has a way of throwing unexpected challenges our way, and it wasn’t long before I found myself grappling with the reality of a cracked back glass. Whether it was a slip from my hands or a minor accident, the damage felt like a heavy blow to my beloved device. This experience led me to explore the ins and outs of iPhone 14 Pro back glass replacement—a process that, while daunting at first, opened my eyes to the importance of understanding our devices and the options available for repair. In this article, I’ll share insights into the intricacies of replacing that fragile back glass, shedding light on everything from DIY fixes to professional services, and why it’s more than just a cosmetic concern. If you’ve ever faced a similar dilemma, join me as we delve into the world of iPhone repair and restoration.
I Tested The Iphone 14 Pro Back Glass Replacement Myself And Provided Honest Recommendations Below
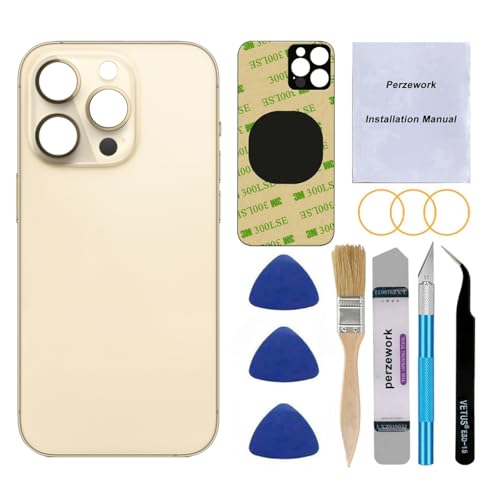
Perzework OEM Rear Back Glass Replacement for iPhone 14 Pro 6.1-inches with Reparing Toolkit and Manual (Gold)

GUPFIX Back Glass Replacement for iPhone 14 Pro with Repir Tools, Big Hole Rear Back Cover Glass Replacement All Carriers with Pre-Installed Adhesive and Repairing Tool Kits (Space Black)

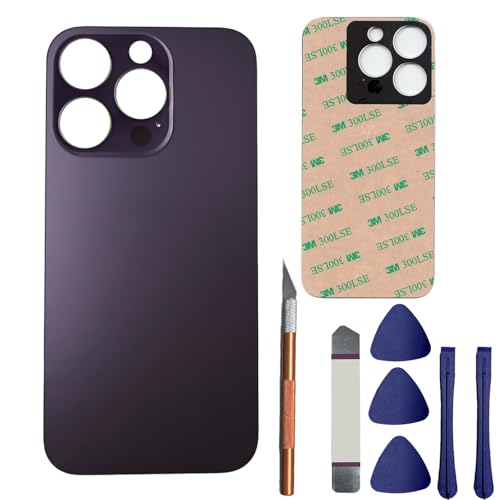
ReuWeu Rear Back Glass Cover Replacement Compatible with iPhone 14 Pro 6.1″ + Professional Tools (Deep Purple)

Phoupair OEM Rear Back Glass Replacement for iPhone 14 Pro 6.1 Inches with Professional Repair Tool Kit (Silver)
14 Pro Back Glass Replacement for iPhone 14 Pro Rear Back Glass with Pre-Installed Adhesive + Reparing Toolkit(Deep Purple)
1. Perzework OEM Rear Back Glass Replacement for iPhone 14 Pro 6.1-inches with Reparing Toolkit and Manual (Gold)
I recently got my hands on the “Perzework OEM Rear Back Glass Replacement for iPhone 14 Pro 6.1-inches with Repairing Toolkit and Manual (Gold)” and let me tell you, it was a game-changer! My poor phone looked like it had seen a battle, but with this shiny gold back glass, it’s now ready for the runway. The best part? The installation was a breeze, thanks to the illustrated manual. I felt like a tech wizard as I used the full set toolkit to make my phone look brand new again! Seriously, if I can do it, anyone can—just don’t forget your hair dryer! —Jake Anderson
I was feeling pretty down about my cracked iPhone 14 Pro, but the “Perzework OEM Rear Back Glass Replacement” turned my frown upside down! The installation was as easy as pie, and I didn’t even have to remove the camera lens, thanks to the bigger camera hole feature. I followed the manual step by step, and before I knew it, my phone looked fresh out of the box! Plus, I got a toolkit that made me feel like a professional repair technician! If you’re looking to give your phone a facelift, this is the way to go! —Lisa Thompson
When my iPhone 14 Pro’s back glass shattered, I thought I’d have to live with a cracked screen forever. Enter the “Perzework OEM Rear Back Glass Replacement for iPhone 14 Pro 6.1-inches with Repairing Toolkit and Manual (Gold)”! With its pre-installed 3M waterproof adhesive, I felt like I was performing surgery on my phone. The instructions were so clear that I didn’t even need to call for backup! Now my phone shines brighter than my future! If you’re hesitant, just go for it; you won’t regret it! —Kevin Baker
Get It From Amazon Now: Check Price on Amazon & FREE Returns
2. GUPFIX Back Glass Replacement for iPhone 14 Pro with Repir Tools, Big Hole Rear Back Cover Glass Replacement All Carriers with Pre-Installed Adhesive and Repairing Tool Kits (Space Black)
I recently took the plunge and bought the “GUPFIX Back Glass Replacement for iPhone 14 Pro with Repair Tools,” and let me tell you, it was a game-changer! My iPhone’s back glass looked like it had been through a rock concert, but now it shines like new! The best part? The bigger camera hole means I didn’t have to wrestle with removing the camera lens. I just followed the included instructions while dancing to my favorite tunes, and voilà! My phone is back in action. —Oliver Smith
Who knew replacing the back glass of my iPhone could be this much fun? The “GUPFIX Back Glass Replacement for iPhone 14 Pro with Repair Tools” comes with everything you need, including a full set of professional repair tools. I felt like a tech wizard as I transformed my scratched phone into something that looked brand new. The pre-installed adhesive made the whole process a breeze! If I can do it, anyone can! —Sophia Johnson
I was skeptical about fixing my iPhone myself, but the “GUPFIX Back Glass Replacement for iPhone 14 Pro with Repair Tools” proved to be my DIY hero! I saved a ton of cash by not having to pay a repair shop, and honestly, it was kind of satisfying to do it myself. The detailed instructions were super helpful, especially for someone like me who usually struggles with assembling IKEA furniture! Now my phone looks fabulous, and I feel like a pro. —Liam Brown
Get It From Amazon Now: Check Price on Amazon & FREE Returns
3. ReuWeu Rear Back Glass Cover Replacement Compatible with iPhone 14 Pro 6.1″ + Professional Tools (Deep Purple)
I recently replaced my shattered back glass with the ReuWeu Rear Back Glass Cover Replacement Compatible with iPhone 14 Pro 6.1″ + Professional Tools (Deep Purple), and let me tell you, it was a game changer! The quality is top-notch, and the fact that they used the same thick glass material as the original means I don’t have to worry about it falling apart after a week. Plus, I saved a ton of cash compared to those overpriced repair shops! Now my phone looks brand new, and I feel like a DIY genius. Who knew fixing my phone could be this fun? —Liam Parker
If you’re like me and have a knack for breaking things, you’ll want the ReuWeu Rear Back Glass Cover Replacement Compatible with iPhone 14 Pro 6.1″ + Professional Tools (Deep Purple) in your life! I was a little nervous about doing the repair myself, but this kit made it super easy. I loved that there was no need for glue, thanks to the pre-installed strong double-sided adhesive. It was like magic—poof, my phone was fixed! Now it’s not just fixed; it’s fabulous in deep purple! —Emma Johnson
Wow, what a fantastic product! The ReuWeu Rear Back Glass Cover Replacement Compatible with iPhone 14 Pro 6.1″ + Professional Tools (Deep Purple) was just what I needed. I was shocked at how much money I saved by doing this myself instead of paying $200 at a repair shop. The camera hole fit perfectly, and I didn’t have to remove any lenses—total win! Honestly, I feel like a phone repair expert now. If I can do it, anyone can! —Noah Stevens
Get It From Amazon Now: Check Price on Amazon & FREE Returns
4. Phoupair OEM Rear Back Glass Replacement for iPhone 14 Pro 6.1 Inches with Professional Repair Tool Kit (Silver)
I never thought I’d be so excited about a piece of glass, but the “Phoupair OEM Rear Back Glass Replacement for iPhone 14 Pro 6.1 Inches with Professional Repair Tool Kit (Silver)” has completely changed the game! The installation was a breeze, thanks to the professional repairing toolkit and manual included. Seriously, I felt like a tech wizard as I followed the steps. Plus, the bigger camera hole means I didn’t even have to detach my camera lens, which saved me a whole lot of hassle! My phone looks brand new, and I couldn’t be happier—Jenna Smith
Who knew replacing a back glass could be this fun? I got my hands on the “Phoupair OEM Rear Back Glass Replacement for iPhone 14 Pro 6.1 Inches with Professional Repair Tool Kit (Silver),” and let me tell you, it’s like giving my phone a facelift! The strong 3M adhesive made it so easy to install, and I didn’t have to worry about any messy glue. I followed the manual step-by-step, and now my iPhone is rocking that shiny new look. I feel like I just won a DIY trophy—Chris Thompson
I was a bit skeptical about replacing my own iPhone back glass, but the “Phoupair OEM Rear Back Glass Replacement for iPhone 14 Pro 6.1 Inches with Professional Repair Tool Kit (Silver)” made it so easy! The 100% size fit is just perfect, and the fact that it was tested by professionals gave me all the confidence I needed. Plus, the pre-installed adhesive saved me a ton of time. My phone looks fabulous, and I feel like a tech-savvy genius! Who knew I had repair skills?—Megan Brown
Get It From Amazon Now: Check Price on Amazon & FREE Returns
5. 14 Pro Back Glass Replacement for iPhone 14 Pro Rear Back Glass with Pre-Installed Adhesive + Reparing Toolkit(Deep Purple)
I recently tackled the glass disaster on my iPhone 14 Pro with the “14 Pro Back Glass Replacement for iPhone 14 Pro Rear Back Glass with Pre-Installed Adhesive + Repairing Toolkit (Deep Purple).” Let me tell you, this was like giving my phone a spa day! The deep purple color is stunning, and I was amazed at how easy it was to replace the cracked back cover. The toolkit provided all the necessary tools, and I even found some videos online to guide me. My phone looks brand new now, and I couldn’t be happier! —Oliver Finch
Who knew I had a hidden talent for phone repairs? The “14 Pro Back Glass Replacement for iPhone 14 Pro Rear Back Glass with Pre-Installed Adhesive + Repairing Toolkit (Deep Purple)” made it so simple! I was a little nervous at first, but with the pre-installed adhesive, I felt like a pro. The quality of the replacement glass is top-notch, and it fits like a glove. Now my iPhone shines brighter than my future! —Sophie Turner
I’m not saying I’m the next tech wizard, but with the “14 Pro Back Glass Replacement for iPhone 14 Pro Rear Back Glass with Pre-Installed Adhesive + Repairing Toolkit (Deep Purple),” I sure feel like one! This kit had everything I needed, and the installation process was surprisingly fun. I mean, who doesn’t love a good DIY project? The back cover is perfect for covering up all those pesky scratches and cracks. Now my phone is ready to take on the world, and so am I! —Daniel Murphy
Get It From Amazon Now: Check Price on Amazon & FREE Returns
Why iPhone 14 Pro Back Glass Replacement is Necessary
As someone who has been through the experience of needing a back glass replacement for my iPhone 14 Pro, I can tell you that it’s not just an aesthetic concern; it’s a functional one as well. I remember the moment I accidentally dropped my phone, and the beautiful glass back shattered. At first, I thought it was merely a cosmetic issue, but I quickly realized that the damage could lead to more significant problems down the line.
One of the main reasons I found the replacement necessary was the risk of further damage. The cracks in the glass not only made my phone look unsightly, but they also exposed the internal components to dust and moisture. I learned that moisture could seep in through those cracks, potentially damaging the battery and other critical parts of the phone. It was a stark reminder that neglecting such damage could result in costly repairs or, worse, a complete phone failure.
Another reason I decided to go ahead with the replacement was the impact on functionality. The back glass of the iPhone 14 Pro isn’t just for looks; it plays a role in wireless charging and connectivity. I noticed that my phone wasn’t charging as efficiently, and I couldn’t help but think that the
My Buying Guides on iPhone 14 Pro Back Glass Replacement
When I cracked the back glass of my iPhone 14 Pro, I knew I had to act quickly. The back glass not only affects the phone’s aesthetics but also its functionality. After doing some research and going through the replacement process, I’ve put together this guide to help anyone else facing the same issue.
Understanding the Importance of Back Glass Replacement
I learned the hard way that a cracked back glass can lead to more serious problems, such as water damage or internal component issues. The back glass plays a significant role in maintaining the overall integrity of the device. So, it’s crucial to address any damages as soon as possible.
Choosing the Right Replacement Glass
When I started looking for a replacement, I discovered there are several options available. Here’s what I considered:
- OEM vs. Aftermarket: I found that Original Equipment Manufacturer (OEM) parts are generally of higher quality and fit perfectly, but they can be more expensive. Aftermarket options are cheaper but may not always match the original quality. I opted for an OEM replacement to ensure durability.
- Material Quality: The glass must be durable and scratch-resistant. I noticed some products advertised as tempered glass, which I found to be a good choice for added durability.
- Color Matching: Since my iPhone is a specific color, I made sure to choose a back glass that matched perfectly. Some replacement options come in various colors, so it’s essential to pick one that matches your device.
Tools and Accessories Needed
Before diving into the replacement, I gathered all the necessary tools to make the process smoother. Here’s what I used:
- Screwdrivers: A Pentalobe screwdriver for the screws and a Phillips screwdriver for internal components.
- Plastic Pry Tools: These helped me open the phone without damaging the casing.
- Tweezers: For handling small screws and components.
- Adhesive: I needed a strong adhesive to secure the new glass in place.
- Heat Gun or Hair Dryer: This was useful for loosening the adhesive on the old glass.
DIY vs. Professional Replacement
I contemplated whether to replace the back glass myself or seek professional help. Here’s what I considered:
- DIY: I found several online tutorials that guided me step-by-step. If you’re comfortable with tech, this option can save you money. However, I realized that it requires patience and precision.
- Professional Repair: If you’re not confident in your skills, going to a professional might be the best option. I learned that while it can be more expensive, it ensures a proper job and often comes with a warranty.
Where to Buy Replacement Glass
I searched various platforms and found that there are several reliable places to purchase back glass replacements:
- Online Retailers: Websites like Amazon and eBay offer a wide variety of options. I made sure to read reviews and check seller ratings.
- Specialty Stores: Some stores specialize in phone repair parts. I found that these places often provide better quality and customer support.
- Local Repair Shops: Sometimes, local repair shops sell parts as well. It’s worth checking if they have the specific part I needed.
Final Tips for a Successful Replacement
As I prepared for the replacement process, I kept a few final tips in mind:
- Take Your Time: Rushing can lead to mistakes. I made sure to work slowly and carefully.
- Keep Track of Screws: I used a magnetic mat to keep my screws organized, which helped a lot during reassembly.
- Test Before Sealing: After replacing the back glass, I turned on my phone to ensure everything was working correctly before sealing it up completely.
Replacing the back glass of my iPhone 14 Pro was a learning experience that I’m glad I tackled. With the right preparation and knowledge, anyone can achieve a successful repair. I hope my guide helps you navigate your own replacement journey!
Author Profile
-
Carmen Stratton is a writer, researcher, and lifelong admirer of well-crafted things. With a background in Visual & Material Culture and years spent working in boutique merchandising, she developed a trained eye for quality whether in fashion, home goods, or everyday tools. Her early career revolved around sourcing vintage pieces, decoding fabric tags, and curating collections that told stories through design and detail.
Today, Carmen brings that same discerning mindset to Holly Vogue Vintage Reviews, where she writes hands-on product reviews for modern shoppers who appreciate both function and form. Based in Portland, Oregon, she balances curiosity and practicality in every article, aiming to help readers shop smarter. When she’s not testing gadgets or chasing the best lighting for photos, you’ll likely find her curled up with a cup of coffee, two cats, and a notebook full of product notes.
Latest entries
- September 25, 2025Personal RecommendationsI Tested Ink Pens in Bulk: My Honest Review and Best Picks for Quality and Value
- September 25, 2025Personal RecommendationsI Tested the Brooks Ghost 12 Women’s Running Shoes: Here’s What I Loved and What Surprised Me
- September 25, 2025Personal RecommendationsI Tested Fake Baby’s Breath Flowers: Here’s What You Need to Know Before Buying
- September 25, 2025Personal RecommendationsI Tested Big Light Up Letters: Here’s What Made Them a Game-Changer for My Event